

Introduction
Previously, in CDC in Production: An Operating Guide, we discussed log-based CDC as a generic design pattern for data transfer.
In this guide, we focus on setting up a Debezium-based CDC pipeline between MySQL database and two example destinations: Snowflake and Materialize.
We begin with a high-level architecture and briefly touch upon various topologies, before going into the details of installation and configuration. We also describe the operational details of running, monitoring, and troubleshooting of the various components in the pipeline.
This guide assumes that the reader is familiar with CDC as a concept, and has already read CDC in Production: An Operating Guide. It also assumes a good understanding and operational experience on MySQL, Kafka Connect, Kafka and Snowflake in production environments.
Setting up and Configuring the CDC Pipeline
In this section, we’ll take a closer look at configuring MySQL (version 8 or above) for emitting CDC events. We’ll also look into a few key points to consider regarding your specific MySQL architecture and cluster topology.
We based the diagram below on this architecture diagram, and have tweaked it to show a Debezium-based implementation.

Configuring MySQL as a CDC source
Connecting to Standalone, Primary or Replica?
You could use a standalone MySQL server or a cluster primary as your CDC source. In both cases, all you need to do is ensure the binary log is enabled.
However, for better performance and availability, we recommend you use a replica instead of the cluster primary. Reading from a replica reduces the load on the primary server and maintains CDC continuity when the primary fails and another replica is promoted to take its place.
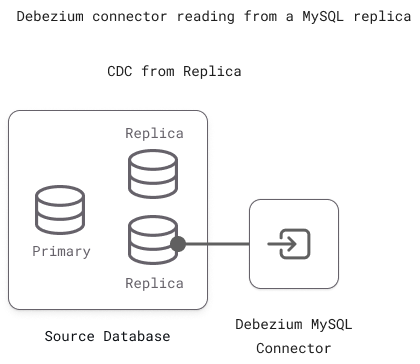
Often (especially in service-oriented architectures), there are multiple MySQL databases, each bound to a different domain or set of microservices. In those scenarios, the database clusters could each have their own Debezium connector reading from them.

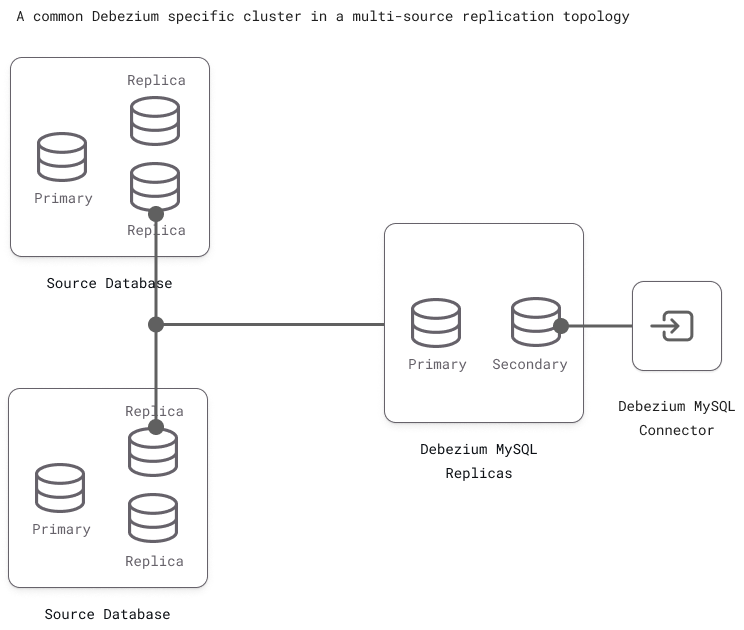
Or, another approach is to create a Debezium-specific cluster to aggregate data from all the parent clusters (multi-source replication). This cluster can then serve as an isolated source for emitting CDC events.
Enabling Global Transaction Identifier (GTID)
The cluster topologies are usually complex in production environments and may include multiple primary servers and replicas to ensure higher availability. Such topologies use a MySQL feature called GTID (Global Transaction Identifier which helps uniquely identify every database transaction across the cluster. This is very efficient for CDC because it facilitates Debezium to seamlessly failover to a new replica. Also, Debezium relies on GTID for incremental snapshots - a more performant way of taking database snapshots.
Since MySQL version 5.6, GTID is enabled by default. Here is how you can do the same thing manually:
- Set the
gtid_modetoON. - Set
enforce_gtid_consistencytoON.
Enabling Binary Log
In MySQL version 8.0 and above, the binary log is enabled by default. Here’s how you can do it manually:
server-id         = <server-id> # This can be obtained by querying the global_variables like this - SELECT variable_value FROM information_schema.global_variables WHERE variable_name='server_id';

log_bin           = mysql-bin
binlog_format     = ROW
binlog_row_image  = FULL
expire_logs_days  = 10
Binlog_row_value_options = ""
For more details on these configurations and possible values, check out the Debezium documentation. For specifics on your version of MySQL, check out the MySQL documentation.
Users, roles and permissions
Debezium MySQL connector needs an ID with a password to connect to the MySQL server. We recommend you create a new user ID and grant the necessary permissions to Debezium:
GRANT SELECT, RELOAD, SHOW DATABASES, REPLICATION SLAVE, REPLICATION CLIENT, LOCK TABLES ON *.* TO 'user' IDENTIFIED BY 'password';In the case of managed MySQL offerings, there are a few additional factors to consider. They are beyond the scope of this article, but you could check out Debezium’s MySQL documentation page for details.
Session Timeout
To avoid large databases from timing out while Debezium is still reading the binary log, you could set suitable timeout values for the system variables interactive_timeout and wait_timeout.
Installing and configuring Debezium
More often than not, Debezium gets installed as a source connector for Kafka Connect. Kafka Connect is the data integration and transformation system built on top of Kafka. It supports various pluggable connectors through which data flows in and out of a Kafka messaging system.
Debezium uses custom source connectors to read the binary write-ahead-logs from a source database, detect the changes in the source data, and emit them as events on Kafka topics. On the other side of the Topic, a sink connector consumes these events and stores them in the destination - in the context of this article, that would be Snowflake or Materialize.
Debezium provides source connectors for all popular databases like MySQL, Postgres, and Mongo.
Detailed documentation is available for installing Kafka and Kafka Connect, so we limit the scope of this section to the installation and configuration of Debezium MySQL connector.
Installing MySQL Connector
Command line
The easiest way to install a Debezium connector is to use the confluent-hub command line utility(bundled with Kafka Connect).
confluent-hub install debezium/debezium-connector-mysql:2.1.4For more information check out the confluent-hub instructions.
Manual installation
Alternatively, you could download the latest version of Debezium MySQL Kafka Connector from Maven Central. Unzip and untar the downloaded tarball into a folder on a file system that your Kafka Connect can access.
Then, add the folder to Kafka Connect’s plugin.path configuration. Restart Kafka Connect so it can load the connector.
Pre-built images
Debezium also publishes pre-built container images for Kafka Connect with the MySQL Debezium connector pre-installed. They are available on Quay.io as well as Docker Hub.
Configuring the MySQL Connector
After installation, the connector will need to be configured. This step mainly includes the connection details for MySQL, Kafka, and other properties.
Here is a sample configuration:
{
    "name": "inventory-connector",
    "config": {
        "connector.class": "io.debezium.connector.mysql.MySQLConnector",
        "database.hostname": "mysql",
        "database.port": "3306",
        "database.user": "${file:/data/credentials.properties:DB_USER}",
        "database.password": "${file:/data/credentials.properties:DB_PASS}",
        "database.server.id": "184054",
        "topic.prefix": "orders_service",
        "database.include.list": "orders",
        "schema.history.internal.kafka.bootstrap.servers": "kafka:9092",
        "schema.history.internal.kafka.topic": "schema-changes.orders",
        "key.converter": "io.confluent.connect.avro.AvroConverter",
        "value.converter": "io.confluent.connect.avro.AvroConverter",
        "key.converter.schema.registry.url": "http://schema-registry:8081",
        "value.converter.schema.registry.url": "http://schema-registry:8081"
    }
}
Two Important Notes on this Configuration:
- Externalize Secrets - The official documentation for the connector doesn’t mention this, but it is possible to express the MySQL credentials as externalized secrets instead of plain text in the configuration.
- Use AVRO Schema - By default, Debezium will deserialize messages into JSON and include information about the data schema in every message, making them quite verbose. We recommend switching over to using Avro for two reasons: (1) Improved schema change tracking capabilities. (With Avro, message schema is tracked in a schema registry that downstream consumers can use.) (2) Reduced storage/bandwidth requirements - Referencing the registry instead of inlining schema in each message can cut message size in half.
The configuration can be uploaded using Kafka Connect’s REST API. Unless Kafka is configured to automatically create new topics, you will need to manually create them before uploading the configuration. As soon as the configuration is uploaded, the connector starts building an initial snapshot of the database.
Using Kafka Topics
Debezium uses the following categories of Kafka topics.
| Kafka Topic | Purpose |
|---|---|
| Per-table change data capture topic | Used for storing table-specific change events (Inserts, Updates and Deletes). Sink Connector(s) consume events from this topic. |
| Database schema history topic | Internal topic (for connector use only). Used for storing the history of all schema changes (DDLs). Used when the connector resumes after a failure and needs to restore the schema state to the point when it stopped. |
| Database schema change topic | Used to emit schema change events if needed. This can be enabled by setting include.schema.changes property to True. Not to be confused with the schema history topic. |
Kafka topics will need to be manually created by the Kafka administrator. Alternatively, you could enable automatic topic creation in Kafka at runtime. This is particularly useful in situations like new table addition because it makes it easier for Debezium to automatically create a new Kafka topic to emit the change events without manual intervention.
For Kafka version 2.6 and later, Debezium recommends using Kafka Connect to auto-create the topics.
Configuring the destinations
At a high-level, the difference between the two destinations we’ll cover is:
- Materialize is an “OLAP read-replica” - If your use case needs to operate on the current state of your primary database, Materialize is the right fit.
- Snowflake has the complete history of data - If your use case needs to analyze changes over time, or generally work with historic states of the primary database (e.g.: SCD Type 2 tables), Snowflake is the right fit.
Materialize Destination
Materialize actively connects to your Kafka cluster and handles consuming data, formatting, deduplication and upsert/merge logic, so no additional service (no connector) is necessary to get data flowing. But, as a result of this architecture, we need to do some up-front configuration work to securely grant Materialize access to Kafka.
Creating Secure Access to Kafka
Like databases, production Kafka clusters are almost never exposed to the public internet, even with authentication methods active. But Materialize runs on a Materialize-managed AWS account and needs to be able to connect to Kafka and consume CDC messages.
With that in mind, there are several overlapping security options available:
- Allowlist Static IP Addresses - Every Materialize environment will report the static IP addresses used to make external connections in a system table
mz_egress_ips. As an administrator, you can use these in a firewall rule on your Kafka cluster to only allow public internet connections from pre-determined Materialize IPs. - Create SSH Tunnel with Bastion Hosts - Another common workaround for granting select external connections to private resources is via SSH tunnel. This can be done for Kafka
- AWS PrivateLink - If the Kafka cluster is hosted on AWS MSK, PrivateLink can be used to create a software-defined secure connection between the MSK cluster and Materialize.
One or more of the above methods should be used to create a secure CONNECTION from Materialize to the Kafka cluster containing the CDC data. For example, here is a connection to Kafka and Schema Registry established via SSH bastion:
-- ssh tunnel connection object
CREATE CONNECTION ssh_connection TO SSH TUNNEL (
    HOST '<SSH_BASTION_HOST>',
    USER '<SSH_BASTION_USER>',
    PORT <SSH_BASTION_PORT>
);

-- kafka connection object
CREATE CONNECTION kafka_connection TO KAFKA (
BROKERS (
    -- ssh tunnel enables usage of private network dns
    'broker1:9092' USING SSH TUNNEL ssh_connection,
    'broker2:9092' USING SSH TUNNEL ssh_connection
    )
);

-- schema registry connection object
CREATE CONNECTION csr_connection TO CONFLUENT SCHEMA REGISTRY (
    URL 'schema-registry:9093',
    SSH TUNNEL ssh_connection
);
In production, the Materialize Terraform provider can be used to properly externalize secrets and track the connection configuration in git.
Creating the Source Object
Sources are objects in Materialize that handle pulling in data (CDC data from Kafka in this case), upsert/merge logic, progress tracking, deduplication, recovery, etc…
To create a SOURCE for a MySQL table replicated to Kafka, follow this MySQL CDC Guide in docs to create a source that properly interprets the Debezium CDC messages.
CREATE SOURCE orders_transactions
    FROM KAFKA CONNECTION kafka_connection (TOPIC 'orders_service.orders.transactions')
    FORMAT AVRO USING CONFLUENT SCHEMA REGISTRY CONNECTION csr_connection
    ENVELOPE DEBEZIUM
    WITH (SIZE = 'small');
Three things to Note:
- Use previously created connections - The source is using the
kafka_connectionandcsr_connectioncreated previously. - One SOURCE per Topic/MySQL Table - Unlike the Debezium config above and Snowflake config below, there is no “all topics” syntax, each topic (each MySQL table) must be created as a separate SOURCE.
- Source Sizing - Because sources are handling the work of a connector (consuming messages, basic parsing/deserialization, upsert/merge logic) they can take a significant amount of compute resources, for guidance on sizing see best practices on sizing a SOURCE.
Once the SOURCE is created, the Kafka schema registry is used to automatically infer the columns and types for the source table, which is directly queryable (or more usefully, the source can be referenced in materialized views).
Snowflake Destination
To get CDC data into Snowflake, you need to create a service (a sink connector) that pushes updates from Kafka into raw tables in Snowflake.
Kafka Connect Sink Connector
Kafka Connect provides destination-specific sink connectors. The setup and configuration depends on your choice of sink connector. In this section, we’ll briefly look into the Snowflake sink connector.
Installing and Configuring Snowflake sink connector
Like MySQL source connector, Snowflake sink connector can be installed via confluent-hub CLI or manually, by copying the jar files.
The connector requires permissions on Snowflake to create destination tables and other Snowflake objects. For this, we recommend you create a custom role in Snowflake with the necessary permissions. A user id can then be assigned to this role. More details on this can be found here.
Here is a sample configuration for the Snowflake connector:
{
  "name": "orders-service-snowflake-sink-connector",
  "config": {
    "connector.class": "com.snowflake.kafka.connector.SnowflakeSinkConnector",
    "tasks.max": "8",
    "topics.regex": "orders_service\\.orders\\.[a-z,A-Z,0-9,_]*",
    "buffer.count.records": "10000",
    "buffer.flush.time": "60",
    "buffer.size.bytes": "5000000",
    "snowflake.url.name": "<<snowflake url>>",
    "snowflake.user.name": "<<snowflake user id>>",
    "snowflake.private.key": "<<private-key>>",
    "snowflake.database.name": "cdc_raw",
    "snowflake.schema.name": "orders",
    "key.converter": "org.apache.kafka.connect.storage.StringConverter",
    "value.converter": "com.snowflake.kafka.connector.records.SnowflakeAvroConverter",
    "value.converter.schema.registry.url": "http://schema-registry:8081",
  }
}
Key points to note:
- The connector must connect to Snowflake via a user ID and a private-key. Externalizing secrets is recommended in production environments.
- Kafka topics can be expressly listed or specified via regular expression so the connector can consume from them.
- At times Snowflake appends a suffix to the table name, so that the generated name is unique and conforms to the identifier rules.
- The
key.converterandvalue.convertervalues can be set as in the above example, so that the converter can parse the Debezium message formats correctly.
As soon as the connector configuration is uploaded, the connector starts reading the messages from the Kafka topics and inserting records into Snowflake tables.
Table Schema
The Snowflake connector creates two columns in the destination tables - RECORD_CONTENT and RECORD_METADATA.

Raw data ingested from Snowflake Connector
RECORD_CONTENT contains the change event in JSON format as per the schema defined by the source connector (in our case, the Debezium MySQL connector). RECORD_METADATA contains metadata about the Kafka message, also in JSON format.
More details can be found at Snowflake sink connector documentation.
Other aspects to consider
There are a few other aspects to consider while configuring the connectors and setting up a CDC pipeline. Let’s look at a few of them in this section.
Event flattening and transformation
Raw data from CDC gets stored in a single VARIANT type column called RECORD_CONTENT. The structure of the message is too complicated to be of much practical use. So the data needs to get transformed into a flat structure resembling the source table’s schema.
In the case of the MySQL source connector, Debezium achieves this by using Kafka’s Single Message Transformations (SMTs). It provides an event flattening SMT, which, when configured, emits a flattened event instead of the usual, deeply nested one.
Technically, this event-flattening SMT can be applied to the sink connector. But in the case of the Snowflake Kafka Connector, there is a known limitation (it does not support SMTs out-of-the-box). In this case the raw events must be post-processed and flattened using SQL. Here’s a blog post by Vimeo’s engineering team explaining how they have achieved this.
Data Types Mapping
In most cases - especially the primitive data types, the default converter works just fine. But if it doesn’t, you could create a custom converter. Be sure to inspect the default mapping between MySQL data types and Debezium data types to help you get this right.
Timestamps and other temporal data types require special care because of a few known gotchas.
Event Deduplication
Kafka connectors may not always be able to correctly record the last position/offset in the event of failure. When this happens, systems are likely to induce duplicate events on recovery. It is a fairly common occurrence with distributed data processing systems. Debezium and Kafka Connect are no exceptions to this. Consuming applications are expected to handle this problem gracefully.
In Snowflake, event deduplication can be done as a post-processing step, using SQL MERGE command to upsert the data based on the table’s primary key.
Operationalizing the CDC pipeline
Creating the Initial Snapshot
When first activated, the Debezium source connector creates an initial snapshot of the source database. By default, this is the only time Debezium creates a snapshot. During snapshotting, Debezium typically takes a read lock on the entire database. But if that is not allowed, it takes table-level locks. After that, it reads the current position of the binary log and emits DDL changes from all the tables onto the schema-change kafka topic (if applicable). It also emits CREATE events for each of the MySQL tables. Debezium MySQL snapshot documentation explains this process in detail.
Snapshotting can be a slow and expensive process, especially on large tables. Also, a global read lock prevents other clients from writing for the whole duration. So it is not a viable option in production environments. There are a few ways to work around this limitation:
- Setting the connector property
snapshot.locking.modetononeprevents Debezium from acquiring a global read lock. This option works well when schema changes are definitely not expected to happen during snapshotting. - Setting the connector property
min.row.count.to.stream.resultsreduces the latency of snapshots of very large tables. Beyond the threshold, the table records get read as a stream. - Setting the system variables
interactive_timeoutandwait_timeoutto large values in MySQL will help avoid timeouts during snapshotting.
Taking Incremental Snapshots
As discussed earlier in this article, the conventional method of initial snapshotting has many limitations, especially for large databases. It is slow, holds a global read lock for the entire duration, and only starts reading new/changed records AFTER the snapshot is successful. If the Debezium connector fails midway, the whole process will require restarting. Plus, snapshotting new tables that get subsequently added to the source is cumbersome.
There is another, more efficient way of snapshotting. Debezium offers an incrementalsnapshot feature for MySQL in which the database state gets copied in chunks in parallel with the streaming of change events. This way, the load on MySQL is considerably reduced, making the entire process robust. Also, incremental snapshots do not complain if the table schemas change midway.
However, the incremental snapshot process has its own limitations. Since it uses Debezium’s signaling feature, it needs write access to MySQL, which is far from ideal when data gets read from read-only replicas. Additionally, incremental snapshots require tables to have primary keys to resolve collisions caused by out-of-order events.
Monitoring
Given the number of moving parts in a CDC pipeline, it is critical to monitor them to ensure early error detection and smooth operation. An exhaustive list of all the metrics exposed by all the systems is out of the scope of this article, but let’s look at a few key ones in this section.
MySQL
MySQL monitoring is a complex topic in itself, but in the context of CDC, here are a few key metrics that are worth monitoring:
- Replication slave liveness: includes standard heartbeat checks to ensure that the replica server is up and running and accepting connections.
- Replica-master connectivity and lag: includes replica status metrics checks to confirm that the replica is actively connected with the master and is all caught up.
- Replication Integrity: includes periodic checks of replica integrity using tools (like pt-table-checksum). It is not unusual for replicas to become inconsistent with the master ( for various reasons).
- Binary Log file size: includes frequent checks so that the binary log files are not filling up disk space. Large transactions can cause the binary log files to bloat quite a bit.
- Server load during initial snapshot: includes load inspection on MySQL server, especially during the typical initial snapshotting of large databases where Debezium reads all the existing data in one go. Checks could involve monitoring CPU usage, RAM usage, disk IO, query throughput, and buffer pool usage during the snapshot phase.
Debezium MySQL Connector
Debezium MySQL connector exposes various metrics via JMX:
Snapshot level metrics are emitted each time Debezium takes a full or incremental snapshot. They can be used to monitor the overall progress of snapshotting.
Streaming metrics are emitted as Debezium captures the change events. They can be used to monitor the overall health of the connector. (The lag between source database and Debezium could be a useful metric to observe).
Kafka and Kafka Connect
Standard monitoring and alerting practices must be set up for the Kafka infrastructure. Metrics related to the Kafka connectors and tasks are especially important because they help identify connector failures and performance issues if any.
Kafka Snowflake Connector
Like Debezium MySQL connector, Snowflake Kafka Connector exposes useful metrics over JMX, which can be used to monitor the consumer side lag and/or ingestion failure rate.
Snowflake
Another valuable metric is the Snowpipe resource consumption, especially during snapshots and other periods of intense activity in the source database. Snowpipe does not use a virtual warehouse, so we cannot use Snowflake’s standard resource monitors for credit usage monitoring.
Data Integrity between source and destination
Distributed systems have inherent limitations because of which records can get dropped or duplicated as data moves from source to destination. It is also possible to find mismatches between source and destination records - possibly because of misconfigured transformations, out-of-order events, or bugs (serialization/deserialization process).
These types of data integrity issues are hard to detect. Still, there are tools that can help manage them. Great Expectations and Soda.io are among the more popular data quality tools. They are often used to compare record counts between MySQL and Snowflake. For more rigorous monitoring (for example, record-by-record comparison of datasets), you could employ tools like Datacompy.
Handling Failures
In this section, let’s look at a few possible failure scenarios and how to manage them.
MySQL becomes unavailable
When a MySQL server becomes unavailable, the Debezium MySQL connector will stop. When the server is back online, the connector needs a manual restart. But if GTID is enabled on the MySQL cluster, the Debezium connector can safely and automatically switch to the secondary replica and find its correct position on the binary log.
BinLog purges
If the Debezium connector has stopped for too long, it loses its position on the binary log. Meanwhile, if MySQL has purged away its binary log files (as it does periodically), the Debezium connector, when restarted, might trigger a fresh new snapshot or even fail with an error message (depending on itssnapshot configuration). You can avoid this situation by configuring snapshot.select.overrides such that Debezium can detect and filter out a subset of the data that has already got snapshotted.
Kafka Connect server fails
If the Kafka Connect server fails gracefully, the Debezium connector can record its positions and offsets for all tables before it stops. When the Connect server is resumed, the Debezium connector is restarted and can pick up from where it left off. But if the failure happens to be abrupt, the connector may not have the chance to save its most recent offset. In such cases, it may reprocess some events when it restarts, leading to duplicate events.
Kafka pipeline becomes unavailable
If and when the Kafka brokers become unavailable, the Debezium connector simply pauses until they become available again.
Change Management
In this section we briefly touch upon some of the ways you can handle changes in your setup.
Schema evolution
Debezium MySQL connector can seamlessly handle schema changes in the source database. When a source table undergoes schema change, Debezium emits new records as per the changed schema. The default change data event format includes information on the new schema. When configured, Debezium can also emit schema change events on a separate Kafka topic
There are many techniques to reflect schema changes onto destination systems, including manual schema updates, semi/fully automated schema migrations, and schema registry. A fuller discussion on how to handle these changes in the destination is beyond the scope of this article.
Re-snapshotting
Some scenarios demand ad-hoc snapshots - for instance, CDC pipeline outage, corrupt data, and changes in the source database. In such situations, you could use Debezium’s signaling mechanism to send a manual signal, requesting an ad-hoc snapshot with the configured set of tables. Debezium then creates the snapshot in incremental snapshot mode.
Check out the extensive documentation on Debezium signaling here.
Conclusion/Wrap-up
That’s it for the most important operational aspects of a MySQL CDC pipeline using Debezium.
Debezium is the most popular open-source framework for log-based CDC. The framework is actively developed and maintained by an open source community. It has excellent support for MySQL. That said, a Debezium-based architecture requires careful configuration and monitoring because of its many moving parts.
If you choose Debezium, we recommend you start with a few tables at first and then, over time, grow into a full scale, production-grade pipeline. This approach will help you understand your unique requirements and help you to build and fine-tune a standardized set of operational practices.
As always, let us know your feedback and suggestions in the Materialize community Slack.